Introduction
Are you looking to turn your unique design into a striking enamel pin? Or maybe you’re planning a custom pin for your brand? Knowing the enamel pin creation process is key to ensuring your ideas come to life exactly as you envision. This guide walks you through each step, from design to final product, so you can confidently create high-quality pins that stand out. Whether you’re a professional or just starting out, this guide will help you make informed decisions.

What are Enamel Pins?
Definition and Differences:
Enamel pins are decorative items made by filling metal-stamped designs with enamel paint. These pins can vary greatly in size and application. They might be small enough to attach to clothing, hats, or backpacks, or larger for trading or collecting purposes. Enamel pins are distinct from lapel pins, which are specifically designed to be worn on clothing and are generally smaller in size. Lapel pins can be made using various techniques, not necessarily involving enamel.
Hard vs. Soft Enamel:
A crucial distinction in the world of enamel pins lies between hard enamel and soft enamel pins:
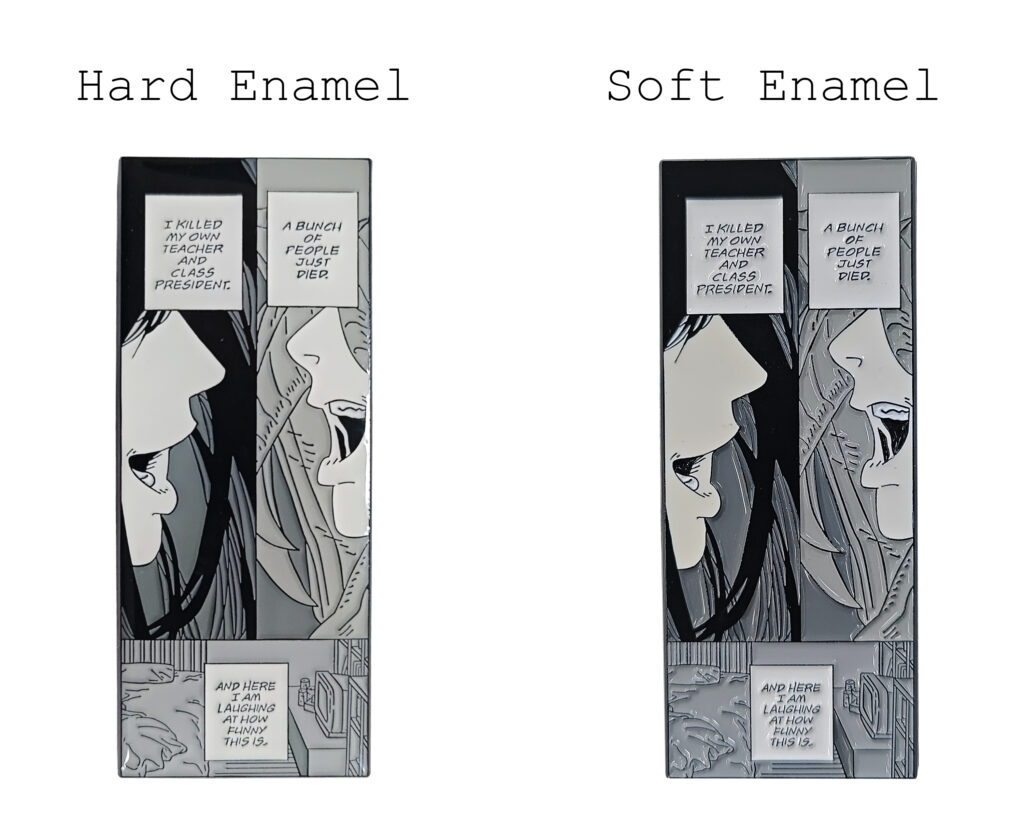
- Hard Enamel Pins: These have a smooth, polished finish. During production, each color is added and baked one by one, resulting in a pin where the enamel and metal borders are flush, creating a sleek, durable surface. Hard enamel pins are often favored for their high-quality, professional look.
- Soft Enamel Pins: These have a textured surface where the enamel sits slightly lower than the metal borders, giving the design a more layered, tactile feel. Soft enamel pins are popular for their vibrant colors and intricate details, often protected by a clear epoxy coating to enhance durability.


Manufacturing Differences:
- Hard Enamel: Requires multiple rounds of firing for each color, leading to a more time-consuming and meticulous process. The result is a durable and smooth finish.
- Soft Enamel: Enamel is filled in one go, with no additional firing needed for each color, making the process quicker. The result is a pin with a more pronounced texture and visual depth.
Designing Your Enamel Pin
Conceptualization:
The design journey begins with a concept, which could range from a corporate logo to a whimsical character. Consider the pin’s size, as intricate designs may lose detail when scaled down.
Design Tools and Software:
Software like Adobe Illustrator is commonly used to create precise, scalable vector designs. Always work in CMYK color mode, which aligns with printing and manufacturing standards.
Creating a Design Template:
With your design ready, create a template that outlines the pin, marks areas to be filled with enamel, and indicates where cuts and holes for attachments are needed.
Common Design Pitfalls:
To avoid issues, keep these tips in mind:
- Avoid Overcomplication: Detailed designs may not translate well at a small scale.
- Color Choices: Test color combinations to ensure they work well together in small areas.
- Line Thickness: Ensure lines are thick enough to avoid blending during the manufacturing process.
From Design to Prototype
Finalizing the Design:
After completing your design, it’s crucial to consult with your manufacturer. They can provide advice on minimizing issues like color bleeding and suggest adjustments for line thickness.
Choosing a Manufacturer:
Selecting a manufacturer is vital. Look for one with experience in high-quality enamel pins, and consider factors like production time, cost, minimum order quantities, and shipping. Companies like Blythepin are known for their expertise in creating custom pins with a variety of effects, ensuring your vision is perfectly realized.
Creating a Prototype:
Your manufacturer will create a prototype or sample pin for your approval. This is where you can fine-tune colors or details before moving to mass production.
The Manufacturing Process
Step-by-Step Manufacturing:
- Mold Creation: A custom mold is created based on your design.
- Stamping: Metal sheets are stamped using the mold to form the pin’s base.
- Attachment: The pin attachment, such as a butterfly clutch, is soldered onto the back.
- Coloring: Enamel colors are carefully hand-filled into the recessed areas of the pin.
- Firing: The pins are fired in a kiln to harden the enamel for hard enamel pins.
- Polishing: After cooling, the pins are polished to a shine.
- Plating: A metal plating (like gold, silver, or nickel) is applied, enhancing durability and aesthetics.
Common Challenges:
During manufacturing, you may encounter issues such as uneven enamel fill or color bleeding. It’s important to work closely with your manufacturer to troubleshoot and make necessary adjustments.
Adding Colors and Details
Enamel and Coating Options:
When adding colors, each hue is applied one at a time. Hard enamel pins require multiple rounds of firing for each color layer, while soft enamel pins often receive a clear epoxy coating for added protection.
Surface Treatments:
Choose between a matte or glossy finish depending on your desired look. Matte finishes provide a subtle, understated appearance, while glossy finishes make colors pop and add visual appeal.
Hard vs. Soft Enamel Decision Guide:

Here’s a quick guide to help you choose:
- Hard Enamel: Choose this for a durable, smooth finish ideal for corporate or formal designs.
- Soft Enamel: Opt for this when you want a more textured feel, often preferred for artistic or playful designs.
Production Time and Ordering
Typically, the production time for enamel pins can range from 2 to 4 weeks, depending on the complexity of the design and the manufacturer’s workload. To ensure your pins are ready when you need them, it’s advisable to contact the manufacturer at least 6 to 8 weeks in advance. This timeframe allows for design finalization, prototype creation, and any necessary revisions before mass production.
Conclusion
Crafting enamel pins is an art that blends creativity with precision. From conceptualizing a design to the final manufacturing steps, every stage is crucial in bringing your vision to life. By following this guide and working with a reliable manufacturer like Blythepin, you can create high-quality enamel pins that resonate with your audience, whether they’re collectors, fans, or customers. Ready to start your enamel pin journey? Let Blythepin help you turn your ideas into vibrant, wearable art.